Harvesting Rainwater Runoff: Sustainable Solutions for Water Conservation
At AAF (Amsha Africa Foundation), we have undertaken numerous runoff rainwater harvesting projects in collaboration with diverse communities across Africa.
Our organization has built strong connections with experts in this field who possess the knowledge and expertise to assist communities in constructing sustainable runoff harvesting systems.
Through our extensive experience and partnerships, we are committed to empowering communities by providing the necessary guidance and support to establish effective runoff rainwater harvesting initiatives. Our network of experts is readily available to offer valuable insights and assistance throughout the project implementation process.
By leveraging our connections and expertise, AAF is dedicated to creating sustainable solutions that enable communities to harness the potential of runoff rainwater for various needs. Join us in our mission to uplift communities and enhance water resource management through innovative and eco-friendly practices.
Essential Steps for Preparing to Build a Runoff Harvesting System
1Establish Community Consensus: Prior to constructing a runoff harvesting system on communal lands, it is crucial for the community to come together and reach an agreement regarding the ownership, operation, and maintenance responsibilities of the system.
2 Conduct Area Assessment: Assessing the potential impact of the system on the surrounding community is essential. Determine whether the proposed location may pose any challenges or conflicts, such as proximity to buildings, roads, or paths. This evaluation ensures that the system does not cause any disruptions or inconveniences for the people in the area.
3 Plan for Resources: Depending on the size of the reservoir or tank you intend to build, allocate the necessary resources. Consider the availability of human labor, drought animals, or earth-moving machinery to successfully construct the system. Adequate planning ensures that the required resources are accessible and in alignment with the scale of your project
Collecting Runoff Water: Identifying Suitable Sources and Ensuring Water Safety
- Roads, Fields, and Bushes: Rainwater that falls on roads, fields, and bushes can serve as potential sources for runoff water collection. However, it is crucial to consider the possibility of contamination by human or animal waste. In such cases, proper treatment of the water is vital before use to ensure its safety.
Contamination Assessment: Assessing the risk of contamination with industrial or agricultural chemicals is essential. It is important to evaluate the surrounding environment and potential sources of pollution that may affect the quality of the collected runoff water.
By carefully examining the collection sources and addressing any contamination risks, we can ensure that the collected runoff water meets the necessary safety standards for its intended use.
Water Pans: Enhancing Water Management for Sustainable Communities
Understanding Water Pans: Harnessing Water for Community Needs
A water pan refers to a man-made reservoir or small dam designed to capture and store rainwater or runoff for various purposes. These water pans play a crucial role in water management, particularly in regions where water scarcity is a challenge.
The primary function of a water pan is to collect and retain water during rainy periods, ensuring its availability during drier seasons. The captured water can be utilized for a range of community needs, including irrigation for agriculture, livestock watering, domestic use, and supporting ecosystem sustainability.
Constructed with careful planning, a water pan is strategically located to maximize water collection from surrounding catchment areas. It is designed to optimize water storage capacity and minimize evaporation losses.
Water pans offer communities a reliable and sustainable water supply, reducing their dependence on unpredictable rainfall patterns and enhancing their resilience in the face of water scarcity. By harnessing the power of water pans, communities can improve their livelihoods, promote agricultural productivity, and mitigate the impacts of drought
Water Pan Capacity: Maximizing Water Storage Potential
The capacity of a water pan, or the amount of water it can hold, varies depending on several factors. These factors include the size, depth, and design of the water pan, as well as the surrounding catchment area and annual rainfall patterns.
Water pans can range in size from small-scale reservoirs to larger, more expansive structures. A small water pan might have a capacity of a few hundred cubic meters, while larger ones can hold several thousand cubic meters or more.
The precise calculation of a water pan’s capacity involves considering the surface area and depth of the pan. Engineers and experts utilize hydrological analysis and measurements to estimate the potential volume of water that can be stored.
It is important to note that the primary purpose of a water pan is to collect and retain water, maximizing its availability during dry periods. The actual volume of water stored can vary depending on the rainfall patterns and the frequency of water utilization by the community.
By implementing well-designed water pans and considering factors such as catchment area and rainfall, communities can optimize their water storage capacity and effectively manage their water resources.
Benefits of Building a Water Pan: Enhancing Water Security and Community Resilience
Constructing a water pan offers a multitude of compelling reasons to bolster water security and enhance community resilience. Here are some key benefits:
Water Availability: A water pan ensures a reliable source of water, especially during periods of low rainfall or drought. By capturing and storing rainwater or runoff, communities can access water for various needs such as agriculture, livestock, and domestic use.
Agricultural Productivity: Water pans provide irrigation opportunities, enabling communities to cultivate crops year-round. With a consistent water supply, agricultural productivity can be enhanced, leading to improved food security and economic opportunities.
Livestock Support: Water pans serve as essential watering points for livestock, ensuring their hydration and well-being. This contributes to maintaining healthy herds and supporting the livelihoods of pastoralist communities.
Ecosystem Preservation: Water pans create small ecosystems that support local flora and fauna, contributing to biodiversity conservation. They provide habitats for aquatic life and attract wildlife, fostering environmental sustainability.
Drought Resilience: Building a water pan strengthens community resilience in the face of drought. It reduces dependence on erratic rainfall patterns and minimizes the impact of water scarcity, enabling communities to thrive even during challenging times.
Community Empowerment: Water pans empower communities by giving them greater control over their water resources. They promote self-sufficiency, reduce reliance on external water sources, and foster community collaboration in water management initiatives.
By constructing a water pan, communities can improve their water security, enhance agricultural productivity, preserve ecosystems, and build resilience in the face of climate variability. Join us in embracing the transformative potential of water pans for sustainable community development.
Choosing the Ideal Location for a Water Pan. Key Considerations
Selecting the optimal location for a water pan is crucial to maximize its effectiveness. Here are important factors to consider:
- Catchment Area: Identify areas with sufficient rainfall and a sizable catchment area to ensure a steady inflow of water. Analyze topography and geological features to assess the potential for runoff collection.
- Proximity to Water Needs: Consider the proximity of the water pan to the community’s water needs, such as agriculture, livestock, and domestic use. Locating the water pan closer to these areas reduces transportation costs and improves accessibility.
- Environmental Impact: Evaluate the environmental impact of the chosen site. Minimize disruption to natural habitats, avoid ecologically sensitive areas, and consider potential downstream effects on ecosystems and water sources.
- Soil Type and Stability: Assess the soil type and stability of the chosen site to ensure proper water retention. Soil should have adequate clay content to prevent excessive seepage and promote effective water storage.
- Land Ownership and Community Consensus: Determine land ownership and secure necessary permissions for the water pan construction. Engage with the community to gain consensus on the location, ensuring ownership and commitment to long-term operation and maintenance.
- Infrastructure Considerations: Consider existing infrastructure, such as roads and accessibility, to facilitate construction and maintenance activities. Assess potential conflicts with buildings, roads, or other structures in the vicinity.
By carefully considering these factors, you can choose an ideal location for a water pan that maximizes water collection, meets community needs, minimizes environmental impact, and ensures long-term sustainability.
Constructing a Water Pan: Step-by-Step Guide
Building a water pan requires careful planning and execution. Here is a step-by-step guide to help you through the process:
Site Selection: Choose an ideal location based on factors such as catchment area, proximity to water needs, environmental impact, soil type, land ownership, and community consensus.
Design and Planning: Develop a detailed design plan for the water pan, considering factors such as size, shape, depth, and overflow provisions. Engage with experts or engineers to ensure an efficient and effective design.
Excavation: Clear the selected site of vegetation and prepare the area for excavation. Use appropriate machinery or labor-intensive methods depending on the size of the water pan. Ensure proper slope and leveling for effective water retention.
Construction: Construct the walls or embankments of the water pan using suitable materials such as soil, compacted clay, or concrete. Consider reinforcing the structure to enhance durability and prevent erosion.
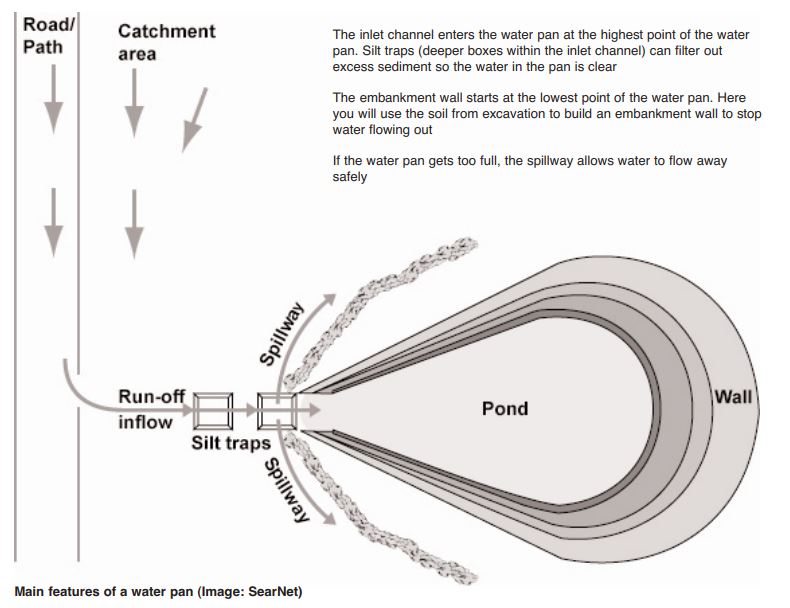
Inlet and Outlet Structures: Install inlet structures to direct water inflow from the catchment area into the water pan. Incorporate outlet structures such as spillways or pipes to manage water levels and prevent overflow.
Water Storage Enhancement: Consider incorporating measures to enhance water storage, such as silt traps or sedimentation chambers to reduce sediment accumulation and maintain water quality.
Landscaping and Vegetation: Consider landscaping the surrounding area to minimize erosion and encourage natural vegetation growth. Planting appropriate vegetation around the water pan can help stabilize the soil and prevent runoff.
Operation and Maintenance: Establish a system for regular maintenance, including desilting, removing debris, and ensuring the functionality of inlet and outlet structures. Engage the community in ownership and responsibility for long-term operation and maintenance.
Water Management: Implement effective water management practices, including efficient water use, irrigation techniques, and community water-sharing agreements, to optimize the benefits of the water pan.
By following these steps, you can successfully build a water pan that enhances water storage, supports community needs, and promotes sustainable water resource management
Minimizing Water Losses in a Water Pan: Effective Strategies
To optimize water retention and minimize losses in a water pan, consider implementing the following strategies:
Liner or Sealing: Use a liner or sealing material such as compacted clay or synthetic liners to minimize seepage through the soil. This prevents water from escaping through the base or sides of the water pan.
Vegetative Cover: Establish a vegetative cover around the water pan, such as grass or shrubs, to reduce soil erosion and enhance water retention. The vegetation acts as a natural barrier, reducing the impact of wind and water erosion.
Windbreaks: Create windbreaks using trees, hedges, or fences around the water pan to reduce evaporation caused by strong winds. Windbreaks provide shade and create a microclimate that helps retain moisture in the water pan.
Evaporation Reduction: Implement measures to reduce evaporation from the water pan’s surface. These can include installing floating covers, using mulch, or applying chemical additives that reduce evaporation rates.
Silt Traps and Sedimentation Chambers: Incorporate silt traps or sedimentation chambers within the water pan to capture sediment and debris. This prevents sediment accumulation, which can reduce the water storage capacity of the pan.
Regular Maintenance: Perform routine maintenance activities such as desilting and removing debris from the water pan. This helps maintain its storage capacity and ensures efficient water collection and storage.
Water-Use Efficiency: Promote water-use efficiency practices within the community, such as employing drip irrigation systems or adopting water-saving techniques. Efficient water management reduces overall water demand, thereby minimizing losses from the water pan.
By implementing these strategies, you can significantly reduce water losses in a water pan, maximize water storage capacity, and enhance the sustainability of your water resource management efforts.
Stabilizing the Walls of a Water Pan: Essential Methods
To ensure the stability and longevity of the walls in a water pan, consider implementing the following methods:
Proper Slope Design: Construct the walls of the water pan with an appropriate slope. A gentle slope helps distribute the pressure evenly and reduces the risk of erosion or wall collapse. Consult with experts or engineers to determine the optimal slope design based on the soil composition and stability.
Compaction and Layering: Ensure proper compaction of the soil layers during construction. Compact each layer thoroughly to enhance its stability and prevent settling over time. Layering the soil in compacted increments strengthens the wall structure and reduces the risk of erosion.
Reinforcement Techniques: Reinforce the walls of the water pan to enhance their stability. This can involve incorporating reinforcing materials such as geotextiles or geogrids within the wall structure. These materials provide additional strength, prevent soil movement, and improve stability.
Vegetative Cover: Establish a vegetative cover along the walls of the water pan to prevent erosion and stabilize the soil. Plant grass, shrubs, or other suitable vegetation that has strong root systems, which help bind the soil and prevent erosion caused by water flow or wind.
Erosion Control Measures: Implement erosion control measures such as erosion control blankets or mats. These materials provide temporary or permanent erosion protection by preventing soil erosion along the walls and promoting vegetation growth.
Maintenance and Repair: Regularly inspect the walls for signs of erosion, cracks, or instability. Perform necessary maintenance activities, such as repairing minor damages or reinforcing weak areas, to ensure the ongoing stability and integrity of the walls.
By employing these methods, you can effectively stabilize the walls of a water pan, reducing the risk of erosion, collapse, and loss of water storage capacity
Water Pan Maintenance: Ensuring Long-Term Functionality
To ensure the long-term functionality of a water pan, regular maintenance is crucial. Here are key practices to consider:
Desilting: Periodically remove accumulated sediment, debris, and vegetation from the bottom of the water pan. Desilting helps maintain the water pan’s storage capacity and prevents sedimentation, which can reduce its effectiveness.
Vegetation Control: Manage vegetation growth around the water pan to prevent blockages or obstructions. Regularly trim and remove excess vegetation that may impede water inflow, outflow, or access to the pan.
Inspection: Conduct routine inspections to identify any signs of damage, erosion, or leaks in the water pan. Check the walls, inlet structures, outlet structures, and other components for cracks, leaks, or structural issues that may compromise functionality.
Repair and Maintenance: Promptly address any identified issues or damages. Repair cracks, leaks, or erosion along the walls, and reinforce weak areas as necessary. Ensure proper functioning of inlet and outlet structures, and repair or replace any damaged components.
Erosion Prevention: Implement erosion control measures, such as maintaining vegetative cover or adding erosion control blankets, to minimize erosion along the banks and protect against soil loss.
Water Quality Monitoring: Regularly test the water quality to ensure it meets desired standards. Monitor for potential contamination or changes in water chemistry that may impact its usability.
Community Engagement: Involve the local community in the maintenance efforts. Promote a sense of ownership and responsibility among community members by encouraging their participation in cleaning, inspection, and maintenance activities.
Record-Keeping: Maintain records of maintenance activities, repairs, and any observations regarding the water pan. This helps track the history of maintenance, plan future actions, and identify trends or recurring issues.
By consistently implementing these maintenance practices, you can ensure the longevity and effectiveness of the water pan, optimize water storage, and support sustainable water resource management for the benefit of the community.
Water Distribution from the Water Pan to Livestock: Practical Methods
To provide water from the water pan to livestock, consider the following practical methods:
Gravity Flow: Utilize the natural force of gravity by positioning the water pan at an elevated location. This allows water to flow downhill through pipes or channels, providing a continuous supply to livestock troughs or watering points at lower elevations.
Troughs and Watering Points: Install troughs or watering points near the water pan for easy access by livestock. These can be constructed using durable materials such as concrete, metal, or plastic. Ensure sufficient capacity to accommodate the number of animals and their water requirements.
Pipeline System: Install a pipeline system to transport water from the water pan directly to the desired locations for livestock watering. Use pipes made of appropriate materials, such as PVC or HDPE, to ensure durability and prevent leakage.
Gravity-Assisted Watering System: Set up a gravity-assisted watering system by connecting a network of pipes or hoses from the water pan to livestock areas. With proper elevation and slope, gravity allows water to flow continuously, providing a convenient water source for the animals.
Watering Carts or Tanks: Use watering carts or tanks filled from the water pan to transport water directly to livestock in areas without access to permanent troughs or pipelines. This method is particularly useful in mobile or remote grazing situations.
Watering Schedule and Rotation: Establish a watering schedule and rotation system to ensure equitable access to water for all livestock. This helps prevent overcrowding and allows adequate time for replenishment of water in the pan.
Monitoring and Maintenance: Regularly monitor the water distribution system to ensure proper functioning and address any issues promptly. Check for leaks, blockages, or damage in pipes, troughs, or tanks, and conduct necessary repairs or replacements as needed.
Remember to prioritize the health and well-being of the livestock by providing clean and fresh water. Regularly clean troughs or tanks, prevent contamination, and monitor water quality to ensure it meets acceptable standards.
By implementing these methods, you can effectively distribute water from the water pan to livestock, supporting their hydration needs and promoting their overall health and welfare.
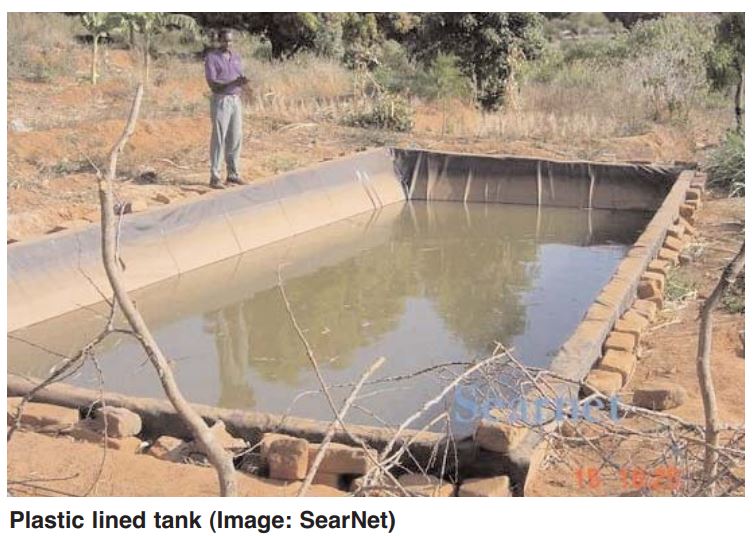
Plastic-Lined Underground Water Tanks for Runoff Rainwater Catchment
Extracting Water from the Tank: Practical Approaches
To retrieve water from a tank, consider the following practical approaches:
Gravity Flow: If the tank is positioned at an elevated location, you can take advantage of gravity flow. Connect a hose or pipe to the tank’s outlet or tap, ensuring it has sufficient slope and length to reach the desired water collection point. Gravity will enable water to flow through the hose or pipe without the need for additional mechanisms.
Manual Pumping: Utilize a manual pump, such as a hand-operated lever pump or a manual siphon pump, to extract water from the tank. These pumps are manually operated and can be easily installed on the tank’s outlet. Pumping action creates suction, drawing water out of the tank and into a hose or container.
Electric Pumping: Install an electric pump to extract water from the tank. Electric pumps are available in various types, such as submersible pumps or surface pumps, depending on the specific requirements of your tank. Connect the pump to the tank’s outlet and use electricity to power the pump, allowing it to efficiently move water from the tank to the desired location.
Gravity-Assisted Tap or Valve: Install a tap or valve at the tank’s outlet to control the water flow. By opening the tap or valve, gravity will enable water to flow from the tank through a hose or pipe connected to the tap. This method is useful for smaller tanks or when a direct gravity flow is feasible.
Bucket or Container: In cases where the tank is small or accessibility is limited, you can manually dip a bucket or container into the tank to retrieve water. Carefully fill the container and lift it out of the tank, being mindful of its weight and your own safety.
When implementing any of these methods, ensure that the tank’s outlet or tap is properly sealed, secure, and free from leaks. Regularly inspect and maintain the extraction mechanism to prevent issues and optimize water retrieval.
Select the method that best suits your specific requirements, considering factors such as the tank’s size, location, available resources, and the amount of water needed.
Determining the Size of an Underground Water Tank
The size of an underground water tank depends on various factors, including the specific needs and requirements of the intended application. Consider the following factors when determining the appropriate size for an underground water tank:
Water Demand: Evaluate the water demand for the intended use or purpose. Consider factors such as the number of occupants or users, their water consumption patterns, and any specific water requirements for activities like irrigation, livestock, or industrial processes. Estimate the daily or monthly water demand to determine the storage capacity needed.
Rainfall Patterns: Assess the local rainfall patterns to understand the availability of rainfall as a water source. Consider the average annual rainfall, distribution over the year, and any significant dry or wet seasons. This information helps determine the necessary storage capacity to collect and store rainfall during periods of higher precipitation.
Water Availability: Consider the availability of alternative water sources, such as municipal supply or other natural water sources. If the underground water tank is intended as a backup or supplement to existing water sources, the size may be adjusted accordingly.
Space Constraints: Evaluate the available space for installing the underground water tank. Measure the dimensions and consider any restrictions or limitations on the depth, width, or length of the tank. Ensure that the tank’s size fits within the available space while allowing for proper installation, maintenance, and access.
Future Expansion or Development: Anticipate any future expansions or developments that may increase water demand. If there are plans for growth or additional water usage in the future, it may be advisable to choose a larger tank size to accommodate potential increases in demand.
Local Regulations and Standards: Familiarize yourself with local regulations and standards governing water storage. Some regions may have specific guidelines or requirements regarding the minimum or maximum size of underground water tanks. Ensure compliance with applicable regulations during the sizing process.
To determine the ideal size of an underground water tank, consult with professionals or engineers experienced in water storage systems. They can assess your specific requirements, analyze the factors mentioned above, and provide recommendations tailored to your needs, ensuring an appropriately sized tank for your intended application.
Choosing the Optimal Shape for Your Water Tank
When determining the ideal shape for your water tank, consider the following factors:
Available Space: Evaluate the space where the tank will be installed. Measure the dimensions, including height, width, and length, to determine any space limitations or constraints. Choose a shape that fits within the available space while providing sufficient storage capacity.
Structural Stability: Select a shape that offers structural stability to withstand the weight of the stored water and any external forces. The tank should be able to maintain its integrity over time, even when placed underground. Shapes with reinforced walls or design features that enhance structural stability are preferable.
Storage Capacity: Assess your water storage needs based on factors such as water demand, usage patterns, and available water sources. Choose a shape that can accommodate the required volume of water while considering factors like the depth, width, and length of the tank.
Installation and Maintenance: Consider the ease of installation and maintenance for different tank shapes. Some shapes may require more complex installation processes or pose challenges during maintenance activities like cleaning or repairs. Choose a shape that allows for convenient access and upkeep.
Cost and Efficiency: Evaluate the cost-effectiveness and efficiency of different tank shapes. Some shapes may be more cost-efficient in terms of construction materials, while others may optimize water circulation or reduce water stagnation. Balancing cost and efficiency is crucial for long-term functionality.
Common tank shapes include rectangular, cylindrical, square, or custom-designed shapes. Each shape has its advantages and considerations, so it’s essential to select the one that best aligns with your specific requirements and constraints.
Consulting with professionals or engineers experienced in water tank systems can provide valuable insights and help determine the optimal shape for your particular project, ensuring efficient water storage and long-term reliability.
Choosing the Ideal Location for Tank Construction
When determining where to build your water tank, consider the following factors:
Accessibility: Select a location that provides convenient access for construction, maintenance, and water distribution. Ensure there is ample space around the tank for equipment and personnel to maneuver during installation and future servicing.
Water Source Proximity: Position the tank in close proximity to the water source it will be collecting from, such as a rooftop catchment area or a natural drainage channel. This reduces the distance water needs to travel and minimizes potential losses or contamination.
Elevation: Consider the elevation of the tank in relation to the surrounding area and the intended water distribution points. If possible, position the tank at a higher elevation than the distribution points to take advantage of gravity flow, reducing the need for additional pumping mechanisms.
Soil Conditions: Evaluate the soil conditions to ensure they can support the weight of the tank when it is filled with water. Stable, well-compacted soil is preferable to prevent subsidence or settling that could compromise the tank’s structural integrity.
Environmental Factors: Take into account any environmental factors that may impact the tank’s operation or longevity. Avoid areas prone to flooding, excessive erosion, or areas with heavy tree cover that may lead to leaf and debris buildup in the tank.
Land Ownership and Permits: Ensure that you have the necessary land ownership rights or obtain appropriate permits and approvals for tank construction. Comply with local regulations, including setback requirements, land-use restrictions, and environmental considerations.
Future Expansion: Consider potential future expansion needs. If you anticipate increased water demand or the possibility of adding more tanks in the future, choose a location that allows for future expansion without significant disruptions or land limitations.
Community Engagement: Involve the local community in the decision-making process. Seek input from community members, stakeholders, and relevant authorities to ensure the chosen location aligns with their needs and addresses any potential concerns.
By carefully considering these factors, you can identify an optimal location for building your water tank, ensuring efficient operation, longevity, and accessibility for maintenance and water distribution activities.
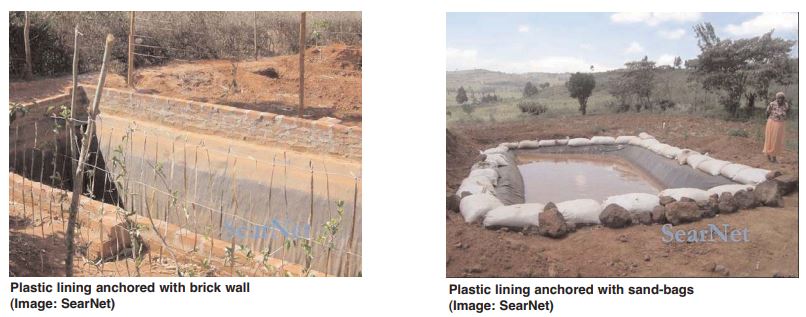
Choosing the Suitable Plastic Lining for a Water Pan or Underground Tank
When considering the plastic lining for a water pan or underground tank, it’s crucial to select a material that provides effective water containment, durability, and compatibility with the intended application. Here are some commonly used options:
High-Density Polyethylene (HDPE): HDPE liners are widely utilized for water pan and underground tank applications. They offer excellent resistance to UV radiation, chemical degradation, and punctures. HDPE liners are durable, flexible, and relatively easy to install. They provide a reliable barrier against water leakage and are available in various thicknesses.
Ethylene Propylene Diene Monomer (EPDM): EPDM rubber liners are suitable for both water pans and underground tanks. They exhibit superior weathering resistance, UV stability, and flexibility. EPDM liners are particularly useful for irregularly shaped structures, as they can conform to different contours. They are available in large sheets, minimizing the number of seams and potential leakage points.
Polyvinyl Chloride (PVC): PVC liners are a cost-effective choice for water pan and underground tank linings. They offer good chemical resistance and durability. PVC liners are available in different thicknesses, allowing customization based on project requirements. Heat-welding techniques can be used to create watertight seals between PVC liner sheets.
Reinforced Polyethylene (RPE): RPE liners combine the benefits of polyethylene with added reinforcement, making them suitable for both water pans and underground tanks. They exhibit excellent puncture resistance, tear strength, and long-term durability. RPE liners are available in various thicknesses and can withstand harsh environmental conditions.
When selecting a plastic lining, consider factors such as the size of the water pan or underground tank, anticipated water volume, local climate conditions, and any specific project requirements. It’s essential to follow manufacturer guidelines for installation, seam sealing, and maintenance to ensure optimal performance and longevity of the lining.
Consult with experts or professionals experienced in water pan and underground tank construction to determine the most suitable plastic lining material for your specific project, ensuring compliance with relevant regulations and standards.
Constructing a Water Pan or Underground Tank
The construction process for a water pan or underground tank involves several key steps:
Site Preparation: Prepare the chosen site by clearing vegetation, removing any debris, and leveling the ground. Ensure the site is free from any underground utilities or obstacles that could interfere with construction.
Excavation: Excavate the area according to the desired dimensions and depth of the water pan or underground tank. Use appropriate machinery or equipment based on the scale of the project. Take care to create smooth and level surfaces within the excavation.
Compaction: Compact the soil at the bottom and sides of the excavation to enhance stability and minimize settling. Use compaction equipment or techniques suitable for the soil type to achieve adequate density.
Lining Installation: Place the chosen plastic lining material inside the excavation, ensuring it covers the entire surface area and extends up the sides of the water pan or underground tank. Allow sufficient overlap of the liner sheets to prevent any potential leakage points.
Seam Sealing: If using multiple sheets of plastic liner, employ manufacturer-recommended methods to seal the seams effectively. This typically involves heat-welding or using appropriate adhesive materials to create watertight seals between liner sections.
Protection Layer: Install a protective layer over the plastic lining to shield it from potential punctures or damage. This layer can consist of geotextile fabric or a layer of sand or fine gravel.
Backfilling: Gradually backfill the excavated area around the water pan or underground tank using suitable material, such as compacted soil or backfill material recommended for structural support. Compact the backfill material in layers to prevent settling or shifting.
Access and Overflow Structures: Construct access points, such as steps or ladders, to facilitate entry into the water pan or underground tank for maintenance or inspection purposes. Install overflow structures or outlets to manage excess water during heavy rainfall or prevent water levels from exceeding the desired capacity.
Landscaping and Erosion Control: Complete the project by incorporating appropriate landscaping measures around the water pan or underground tank to control erosion and promote water conservation. This can involve contouring the surrounding area, planting vegetation, or installing erosion control measures like terracing or mulching.
Throughout the construction process, it’s crucial to adhere to relevant construction codes, safety guidelines, and any local regulations governing water pan or underground tank installations. Engaging experienced professionals or consulting with experts in the field can provide valuable guidance and ensure the construction is carried out effectively and in accordance with best practices.
Maintaining a Plastic-Lined Underground Tank
To ensure the proper functioning and longevity of a plastic-lined underground tank, regular maintenance is essential. Here are key maintenance steps to follow:
Inspect the Tank: Conduct routine visual inspections of the tank’s exterior and interior. Check for any signs of damage, such as cracks, punctures, or wear in the plastic lining. Inspect the tank’s fittings, valves, and seals for leaks or deterioration.
Clean the Tank: Regularly clean the tank to remove any sediment, debris, or organic matter that may accumulate over time. Use appropriate cleaning methods, such as flushing with water or employing mild cleaning agents if necessary. Ensure that cleaning procedures do not damage or compromise the integrity of the plastic lining.
Monitor Water Quality: Regularly test the water quality within the tank. Assess parameters such as pH levels, dissolved oxygen, and microbial contamination. If any issues are detected, take corrective measures, such as implementing appropriate water treatment methods or consulting water quality experts.
Control Vegetation: Keep the area around the underground tank free from excessive vegetation growth. Plants and tree roots can potentially damage the plastic lining or infiltrate the tank, leading to leaks or blockages. Regularly trim or remove vegetation in close proximity to the tank.
Check Access Points: Inspect and maintain access points, such as hatches or manholes, to ensure they are secure, properly sealed, and easily accessible. Regularly clean and remove any debris or obstructions from these access points.
Monitor Water Levels: Regularly monitor the water levels within the tank to ensure an adequate supply for intended uses. Implement appropriate water management practices, such as controlling inflow and outflow rates, to maintain optimal water levels.
Repair and Replacement: Promptly address any identified issues or damages. If the plastic lining is compromised, repair or replace the affected sections following manufacturer guidelines. Ensure that repairs or replacements are conducted by qualified personnel with experience in working with plastic liners.
Document Maintenance Activities: Keep a record of maintenance activities performed, including inspections, cleanings, repairs, and any water quality test results. This documentation helps track maintenance history and facilitates future maintenance planning.
Professional Consultation: Consider consulting with professionals or experts in water tank maintenance to ensure adherence to best practices and obtain guidance specific to your underground tank setup.
By following these maintenance practices, you can maximize the lifespan and functionality of a plastic-lined underground tank, ensuring reliable water storage and minimizing the risk of leaks or contamination.
Benefits of Plastic-Lined Tanks
Plastic-lined tanks offer several advantages, making them a popular choice for various applications. Here are some key benefits:
Excellent Chemical Resistance: Plastic liners, such as high-density polyethylene (HDPE), polyvinyl chloride (PVC), or reinforced polyethylene (RPE), exhibit high resistance to a wide range of chemicals. This makes plastic-lined tanks suitable for storing various liquids, including corrosive substances, without the risk of degradation or contamination.
Watertight and Leak Prevention: Plastic liners provide an effective barrier against leaks and water seepage. When properly installed and maintained, they offer reliable water containment, ensuring that stored liquids remain secure and do not infiltrate the surrounding environment.
Versatile and Customizable: Plastic-lined tanks can be tailored to specific requirements. They are available in various shapes, sizes, and thicknesses, allowing for flexibility in design and accommodating different storage capacities. Additionally, plastic liners can conform to irregular tank shapes or be customized to fit specific dimensions.
Durability and Longevity: Plastic liners are engineered to withstand harsh environmental conditions, including UV radiation, moisture, and temperature fluctuations. They exhibit excellent durability and can provide long-lasting performance when properly installed and maintained. Additionally, certain plastic liners, like HDPE, are resistant to punctures and tears, further enhancing their longevity.
Ease of Installation: Plastic liners are relatively easy to install, particularly when compared to other tank lining materials. They can be pre-fabricated off-site and easily transported to the installation location. The installation process typically involves securing the liner within the tank structure and properly sealing any seams or joints to ensure a watertight enclosure.
Cost-Effective: Plastic-lined tanks often offer cost advantages compared to alternative materials. They are generally more affordable to manufacture, install, and maintain, making them a cost-effective solution for a wide range of applications. Additionally, the durability and long lifespan of plastic liners contribute to overall cost savings over the tank’s operational lifetime.
Low Maintenance Requirements: Plastic-lined tanks require minimal maintenance efforts. The smooth surfaces of plastic liners discourage the accumulation of sediment or residue, reducing the need for frequent cleaning. Routine inspections and occasional repairs, if necessary, can help ensure optimal performance and longevity.
Environmental Considerations: Plastic liners used in tanks can be made from recycled materials, contributing to sustainable practices. Furthermore, plastic-lined tanks can help prevent environmental contamination by securely storing hazardous liquids or preventing leakage into the ground.
These advantages highlight why plastic-lined tanks are a preferred choice for various industries, including water storage, chemical processing, agriculture, and more. It is important to select the appropriate plastic liner material based on the specific requirements and compatibility with the stored liquids to fully leverage these benefits.
Drawbacks of Plastic-Lined Tanks
While plastic-lined tanks offer numerous advantages, it is important to consider potential drawbacks associated with their use. Here are some disadvantages to be aware of:
Vulnerability to Mechanical Damage: Plastic liners can be susceptible to mechanical damage, such as punctures or tears, particularly during installation or maintenance procedures. Sharp objects or heavy impacts can compromise the integrity of the liner, leading to leaks or reduced performance.
Limited Resistance to High Temperatures: Certain plastic liner materials may have limitations when exposed to high temperatures. Elevated temperatures can cause deformation, warping, or weakening of the plastic, compromising its effectiveness and potentially leading to leaks or structural issues.
UV Degradation: Some plastic liners are prone to degradation when exposed to prolonged sunlight or ultraviolet (UV) radiation. This can result in discoloration, brittleness, or reduced strength over time. UV protection measures, such as incorporating UV stabilizers or using appropriate covering materials, may be necessary to mitigate this drawback.
Potential Chemical Incompatibility: While plastic liners generally exhibit good chemical resistance, certain chemicals or substances may be incompatible with specific plastic materials. It is essential to carefully evaluate the compatibility of the stored liquids with the chosen plastic liner to avoid degradation, leaching, or chemical reactions that could compromise the tank’s integrity.
Susceptibility to Environmental Stress Cracking: Some plastic liner materials, such as certain types of polyethylene, may be susceptible to environmental stress cracking. Exposure to certain chemicals, stress concentrations, or environmental factors like temperature variations can lead to cracking or reduced performance over time.
Installation Challenges for Complex Tank Designs: Plastic liners may pose challenges when installing in tanks with complex geometries or irregular shapes. Achieving proper fit and seam sealing in such cases can require additional effort and expertise during the installation process.
Impact of Aging and Weathering: Over time, plastic liners may experience aging effects and weathering, resulting in reduced mechanical properties or changes in appearance. While proper maintenance and regular inspections can help mitigate these effects, long-term exposure to environmental elements may impact the liner’s performance.
Environmental Considerations: Plastic-lined tanks, like any plastic-based products, have environmental considerations associated with their production, usage, and disposal. The selection of environmentally friendly plastic materials, proper waste management practices, and recycling options can help mitigate the ecological impact.
It is crucial to weigh these disadvantages against the specific project requirements and evaluate potential alternatives or mitigation strategies, if needed. Consulting with experts in plastic tank construction, considering specific application conditions, and adhering to manufacturer guidelines can help address potential drawbacks and optimize the performance of plastic-lined tanks.